Scoped enum:s together with bit flags/patterns

Nowadays using a scoped enum (enum class or enum struct) is pretty common. It has its clear benefits when writing type safe code [1]. This article is not about using scoped enums or not, since I don’t see any point in not using it. But instead this article is about how to use enum class together with bit flags or bit patters.

Enums are heavily used as bit flags in many software. I guess we all seen code that looks something like this.

enum {
    Read = 1,
    Write = 2,
    Execute = 4
};

permission = Read | Write;
...
permission |= Execute

When working with embedded systems I stumbled across this both here and there. Either when working directly against some control register or some binary communication protocol, for naming just a few occasions.

Doing the same thing with scoped enum

One problem with the code snippet above is that it does not use scoped enum. Is it possible? Yes - if not this article would be pretty boring right!

The rest of this article is a simple example class (File). This class is part of an implementation of a file class but it just focus on the file permissions flags, nothing else. The example code is available at GitHub. Each step a the article has its separate branch.

Example

Start of the File class

Read full code on GitHub - branch: step-1

To start with we need to define our permissions as an enum.

enum class Permission { Read = 1, Write = 2, Execute = 4 }

Next we need a constructor.

File(const std::string &name, const Permission &permissions);

The goal is to be able to write code that looks like this:

File f2("/tmp/file1", File::Permission::Read |
                      File::Permission::Write);

But when compiling this we get the following error (using GCC-10):

In function ‘int main()’:
error: no match for ‘operator|’ (operand types are ‘play::File::Permission’ and ‘play::File::Permission’)
   10 |     play::File f2("/tmp/file1", play::File::Permission::Read | play::File::Permission::Write);
      |                                 ~~~~~~~~~~~~~~~~~~~~~~~~~~~~ ^ ~~~~~~~~~~~~~~~~~~~~~~~~~~~~~
      |                                                         |                              |
      |                                                         play::File::Permission         play::File::Permission

So the compiler is complaining about that it can’t do this, it’s missing an operator. This is one of the best things with scoped enums, we must tell the compiler how to handle this! So lets solve this in the next step.

Adding our first operator

Read full code on GitHub - branch: step-2

To solve the above compilation error we just need to add the operator that the compiler is asking for. We just need to do a bitwise OR.

But at this point we don’t know which type our enum Permission is. We have not specified any type so it’s up to the compiler to select one. If we don’t know the type how shall we do a type safe bitwise OR?

This is were std::underlying_type comes in handy. In short std::underlying_type will convert the enum down to its underlying data type. So:

enum class : uint8_t Test {...}; // uint8_t when using std::underlying_type.

To create our new OR (|) operator we define the following friend function. Not that we first must convert left hand side (lhs) and right hand side (rhs) into there underlying type, then do the logical OR operation before casting it all back to our correct type File::Permission.

friend Permission operator|(const Permission &lhs, const Permission &rhs);
// Note the inline
inline File::Permission operator|(const File::Permission &lhs, const File::Permission &rhs)
{
    return static_cast<File::Permission>(std::underlying_type<File::Permission>::type(lhs)
                                         | std::underlying_type<File::Permission>::type(rhs));
}

What! Writing all that code for a simple OR? Calling all these functions for a simple or? Talk about plenty of work for nothing and much more instructions to execute, or?

Well it is more code then just using a plain old |. But this code will give us much better type safety. So in my opinion it’s worth it. Regarding more code to execute? For now, just trust me (or jump to the last section in the article). The compilers are smart. Doing this compared to a plain old | is the same thing.

With this first operator we can now write code like this:

File f2("/tmp/file1", File::Permission::Read |
                      File::Permission::Write);

But we need more…

Adding more operators

Read full code on GitHub - branch: step-3

We can now start adding more features to our class. It would be nice to be able to see if a file is readable/writeable/executable.

bool isReadable() const;
bool isWriteable() const;
bool isExecutable() const;
bool File::isReadable() const
{
    return (m_permissions & Permission::Read) == Permission::Read;
}

bool File::isWriteable() const
{
    return (m_permissions & Permission::Write) == Permission::Write;
}

bool File::isExecutable() const
{
    return (m_permissions & Permission::Execute) == Permission::Execute;
}

As you can see in the code above I added a new operator - this time AND (&), which we need to add to the code as well. But this is more o less just a copy of the last operator we added.

File::Permission operator&(const File::Permission &lhs, const File::Permission &rhs)
{
    return static_cast<File::Permission>(std::underlying_type<File::Permission>::type(lhs)
                                         & std::underlying_type<File::Permission>::type(rhs));
}

But what if we would like to be able to set or remove a permission on a file. Lets add the following functions:

void setReadable(const bool &readable);
void setWriteable(const bool &writeable);
void setExecutable(const bool &executable);
void File::setReadable(const bool &readable)
{
    setPermisson(Permission::Read, readable);
}

void File::setWriteable(const bool &writeable)
{
    setPermisson(Permission::Write, writeable);
}

void File::setExecutable(const bool &executable)
{
    setPermisson(Permission::Execute, executable);
}

void File::setPermisson(const Permission &permission, const bool &value)
{
    if (value) {
        m_permissions = m_permissions | permission;
    } else {
        m_permissions = m_permissions ^ permission;
    }
}

Once again we need a new operator, this time XOR (^).

inline File::Permission operator^(const File::Permission &lhs, const File::Permission &rhs)
{
    return static_cast<File::Permission>(std::underlying_type<File::Permission>::type(lhs)
                                         ^ std::underlying_type<File::Permission>::type(rhs));
}

And that’s it!

Performance

TLDR;

Without any code optimizations this implementation will be a bit slower since it involves a function call, but as long as you enable -O (or more) this will produce the same assembler code and with a “unscoped” enum.

In depth performance

I wrote this simple example that I ran using Compiler Explorer. My example has four parts:

  • uint8_t randomValue() - This just return a random number between 0 and 4.
  • class File - Simple example class with one scoped enum and one old enum, Permission and BadPermission. It also has a “OR” operator.
  • File::Permission test1() - Function that takes two random File::Permission and return the OR value of the two.
  • File::BadPermission test2() - Function that takes two random File::BadPermission and return the OR value of the two.
#include <type_traits>
#include <random>

uint8_t randomValue()
{
    std::random_device dev;
    std::mt19937 rng(dev());
    std::uniform_int_distribution<std::mt19937::result_type> dist(0,4);  
    return dist(rng);
}

class File
{
public:
    enum class Permission { Read = 1, Write = 2, Execute = 4 };
    enum BadPermission { Read = 1, Write = 2, Execute = 4 };

    friend Permission operator|(const Permission &lhs, const Permission &rhs) {
        return static_cast<File::Permission>(std::underlying_type<File::Permission>::type(lhs)
                                            | std::underlying_type<File::Permission>::type(rhs));        
    }
};

File::Permission test1()
{

    const auto p1 = static_cast<File::Permission>(randomValue());
    const auto p2 = static_cast<File::Permission>(randomValue());

    return p1 | p2;
}

File::BadPermission test2()
{

    auto p1 = static_cast<File::BadPermission>(randomValue());
    auto p2 = static_cast<File::BadPermission>(randomValue());

    return p1 | p2;
}

By looking at the assembler code for function test1() and compare it with test2() it’s possible to see which of the to functions performs the best.

No optimization

Using Compiler Explorer and x86-64 GCC 11.2 I get the following result.

Using scoped enum and no optimization

Using plain enum and no optimization

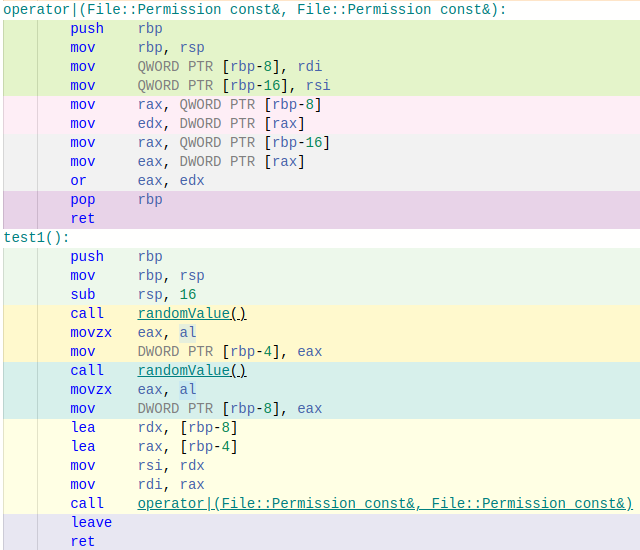
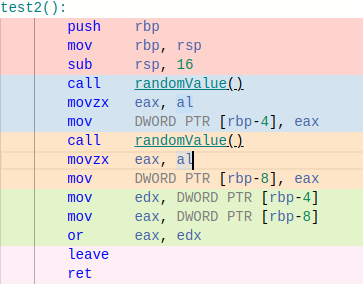
You don’t need to be an assembler guru to see that the performance differs. Our scoped enum (function test1() and operator friend Permission operator|(const Permission &lhs, const Permission &rhs)) will need much more assembler instructions to solve the problem. The main issue here is that it need to call the operator function. But…

With -O optimization

By just enabling optimization on the code we get this:

Comparing scoped `enum` with "plain old" `enum` and executing logical OR

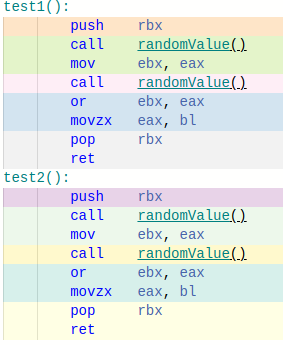
Now we have the exact same assembler code for function test1() and test2(). Once again you don’t need to be an assembler guru to understand that running function test1() will do the exact same thing as running function test2(). This shows that using scoped enum does not decrease the performance of bit flags/patterns compared to not using it, we just need a few lines of extra code!

References

[1 - Why use enum class]

Transforming singletons into something testable

Legacy code and singleton classes seem to go hand in hand which will cause problems when trying to write testable code. This post will look at how a singleton can be transformed into something that is better.

Disclaimer

First of all before we start with anything - I don’t like singletons! This article is not about trying to make singletons something we shall use by dressing it in a nicer costume. The only reason I write this is because singletons exists - especially in legacy code.

One can argue that there are a use for a singleton, and sure there might be. But this blog post is not about that. This blog post is about making your code a little bit simpler to test.

Painful to remove singletons

If you have a large legacy code base that you would like to transform into something more testable singletons can stand in your way. Why you ask. Well frankly because it’s not possible to mock them. In some cases this isn’t a problem for your unit-tests - but in 99% of the cases it is.

Trying to remove singletons is probably the best solution to start with. But if your code base is large this might be really problematic since your architecture probably is built around singleton usage. But just let me be super clear here. Removing singletons is always the best option. What I describe in the rest of this post is a problem solver when removing singletons is not an option.

Classic singleton

As always lets look at code.

In this example I’ve created a SettingsSingleton class. This class can return the values for a specific settings. The settings are read from a file, settings.data, when instantiated. This is a really over simplified implementation. One can of course argue that there no need to a singleton in this case. But think of this as something simple to illustrate.

#pragma once

#include <map>

/**
 * @brief The SettingsSingleton class
 *
 * This is a really simplyfied class just to
 * illustrate a singleton.
 *
 * Yes I know this implementation is not thread safe,
 * but this code is written to illustrate an example.
 */
class SettingsSingleton
{
public:
    enum class Parameter {
        PinCode,
        AlarmTemperature,
        PortNumber,
        InstallationId
    };

    static SettingsSingleton *instance();

    bool hasValue(const Parameter &parameter) const;
    int value(const Parameter &parameter) const;


private:
    SettingsSingleton();

    static SettingsSingleton *m_instance;

    std::map<Parameter, int> m_values;
};
#include "settingssingleton.h"

#include <fstream>
#include <iostream>

SettingsSingleton* SettingsSingleton::m_instance = nullptr;

constexpr const auto settingsFile = "settings.data";

SettingsSingleton *SettingsSingleton::instance()
{
    if (m_instance == nullptr) {
        m_instance = new SettingsSingleton();
    }

    return m_instance;
}

/**
 * @brief SettingsSingleton::hasValue
 * @param parameter Parameter to ask for
 * @return True if the parameter has a valid value, otherwise false
 */
bool SettingsSingleton::hasValue(const SettingsSingleton::Parameter &parameter) const
{
    return m_values.find(parameter) != m_values.end();
}

/**
 * @brief SettingsSingleton::value
 * @param parameter Parameter to ask for
 * @return value if parameter, -1 if invalid.
 *
 * Make sure to check that the parameter has a valid value
 * by calling SettingsSingleton::hasValue() before.
 */
int SettingsSingleton::value(const SettingsSingleton::Parameter &parameter) const
{
    if (hasValue(parameter)) {
        return m_values.at(parameter);
    }
    return -1;
}

SettingsSingleton::SettingsSingleton()
{
    std::ifstream inFile;

    int parameter = 0;
    int value = 0;

    inFile.open(settingsFile, std::ifstream::in);

    while(inFile >> parameter >> value)
    {
        auto p = static_cast<Parameter>(parameter);
        m_values[p] = value;
    }
}

Now we have a really simple SettingsSingleton implementation that anyone is free to use. For example our super simple PinCode class which can determine if an entered pin code is correct or not.

#pragma once

/**
 * @brief The PinCode class
 *
 * This class is just a very simple example
 * of a class that use the SettingsSingleton.
 *
 * Yes, the singleton is not really needed here,
 * but this is just a example to illustrate the problem.
 */
class PinCode
{
public:
    PinCode() = default;

    bool validPinCode(const int enteredPinCode) const;
};
#include "pincode.h"
#include "settingssingleton.h"

/**
 * @brief PinCode::validPinCode
 * @param enteredPinCode
 * @return True if the enteredPinCode is correct.
 */
bool PinCode::validPinCode(const int enteredPinCode) const
{
    auto parameter = SettingsSingleton::Parameter::PinCode;

    if (SettingsSingleton::instance()->hasValue(parameter)) {
        return SettingsSingleton::instance()->value(parameter) == enteredPinCode;
    }

    return false;
}

Using the PinCode class is done by just doing something like this:

if (pinCode.validPinCode(1234)) {
    std::cout << "is valid" << std::endl;
} else {
    std::cout << "is not valid" << std::endl;
}

So now we have our classic singleton nightmare. The class PinCode depends on SettingsSingleton and trying to write a test-case for PinCode is a problem.

Yes - once again one can argue that there is no need for a singleton. Sure - but it’s a singleton for demonstrational purposes.

Transforming this into something more testable

Now let’s look at how we can transform this into something that we can make testable, without removing the singleton. Remember - removing the singleton is the best option. But in this blog post we try to solve an issue were the legacy code makes it more or less impossible to remove the singleton.

First of all - why transform it?

The goal with the rest of the post is to be able to write a test-case for the PinCode class where I’m able to mock the settings parameters.

Step 1: Create an interface for your singleton

In our example the SettingsSingleton has two functions, hasValue and value.

bool hasValue(const Parameter &parameter) const;
int value(const Parameter &parameter) const;

This is what our new interface class shall contain. We also need to move our enum into the interface class.

#pragma once

class ISettings {
public:
    virtual ~ISettings() = default;

    enum class Parameter {
        PinCode,
        AlarmTemperature,
        PortNumber,
        InstallationId
    };

    virtual bool hasValue(const Parameter &parameter) const = 0;
    virtual int value(const Parameter &parameter) const = 0;
};

Step 2: Add the possibility to initialize the singleton

The next thing we need to do might be a bit unorthodox when working with singletons. But the hole idea with this post is to step away from the singleton-pattern a bit.

The idea here is to not let the singleton it self initialize it self but let “us” initialize it at program start (or when it’s a good idea to do it). So instead of creating the singleton the first time we use it we need to “create” it before the first time we use ut. This is were I might step on some people toes. Now we are creating a situation were we might, by mistake, use a singleton before it’s initialized. This is something I’m aware of and something I feel can be okay in comparison. Because by doing this we make our code base simpler to test. So I thing this is a scarify I’m willing to do.

Our new singleton looks like this

#pragma once

#include "isettings.h"

#include <cassert>
#include <memory>

/**
 * @brief The SettingsSingleton class
 *
 * This is a really simplyfied class just to
 * illustrate a singleton.
 *
 * Yes I know this implementation is not thread safe,
 * but this code is written to illustrate an example.
 */
class SettingsSingleton
{
public:
    static void initialize(std::unique_ptr<ISettings> implementation);
    static SettingsSingleton *instance();

    bool hasValue(const ISettings::Parameter &parameter) const;
    int value(const ISettings::Parameter &parameter) const;


private:
    SettingsSingleton() = default;

    static SettingsSingleton *m_instance;

    std::unique_ptr<ISettings> m_implementation;
};
#include "settingssingleton.h"

#include <iostream>

SettingsSingleton* SettingsSingleton::m_instance = nullptr;


void SettingsSingleton::initialize(std::unique_ptr<ISettings> implementation)
{
    assert(m_instance == nullptr);
    m_instance = new SettingsSingleton();
    m_instance->m_implementation = std::move(implementation);
}

SettingsSingleton *SettingsSingleton::instance()
{
    assert(m_instance != nullptr);
    return m_instance;
}

/**
 * @brief SettingsSingleton::hasValue
 * @param parameter Parameter to ask for
 * @return True if the parameter has a valid value, otherwise false
 */
bool SettingsSingleton::hasValue(const ISettings::Parameter &parameter) const
{
    if (m_implementation) {
        return m_implementation->hasValue(parameter);
    }
    return false;
}

/**
 * @brief SettingsSingleton::value
 * @param parameter Parameter to ask for
 * @return value if parameter, -1 if invalid.
 *
 * Make sure to check that the parameter has a valid value
 * by calling SettingsSingleton::hasValue() before.
 */
int SettingsSingleton::value(const ISettings::Parameter &parameter) const
{
    if (m_implementation) {
        return m_implementation->value(parameter);
    }
    return -1;
}

There are two big changes.

  1. We now have a initialize-function.
  2. We now need an implementation for the singleton to work.

initialize-function - This is the magic

void SettingsSingleton::initialize(std::unique_ptr<ISettings> implementation)
{
    assert(m_instance == nullptr);
    m_instance = new SettingsSingleton();
    m_instance->m_implementation = std::move(implementation);
}

The above code is the magic that makes our project more testable. What we do here is allowing the user to initialize our singleton with any type implementation as long as it implements the ISettings interface. The reason I used a std::unique_ptr here is to make it clear that the SettingsSingleton takes ownership of the implementation.

To initialize the singleton we do:

SettingsSingleton::initialize(std::make_unique<SettingsImpl>());

In the above code we initialize our singleton with the SettingsImpl class.

The implementation class

As you can see above we now need an implementation class. Our singleton is transformed in a way so every call to it will try to use the implementation. For example the value()-function now looks like this:

int SettingsSingleton::value(const ISettings::Parameter &parameter) const
{
    if (m_implementation) {
        return m_implementation->value(parameter);
    }
    return -1;
}

This assumes that our unique_ptr is initialized and the just let the implementation do whatever it likes.

When transforming the above singleton I created a SettingsImpl-class that looks like this

#pragma once

#include "isettings.h"

#include <map>

class SettingsImpl : public ISettings
{
public:
    SettingsImpl();

    bool hasValue(const Parameter &parameter) const override;
    int value(const Parameter &parameter) const override;

private:
    std::map<ISettings::Parameter, int> m_values;
};
#include "settingsimpl.h"
#include <fstream>

constexpr const auto settingsFile = "settings.data";

SettingsImpl::SettingsImpl()
{
    std::ifstream inFile;

    int parameter = 0;
    int value = 0;

    inFile.open(settingsFile, std::ifstream::in);

    while(inFile >> parameter >> value)
    {
        auto p = static_cast<ISettings::Parameter>(parameter);
        m_values[p] = value;
    }
}

/**
 * @brief SettingsImpl::hasValue
 * @param parameter Parameter to ask for
 * @return True if the parameter has a valid value, otherwise false
 */
bool SettingsImpl::hasValue(const ISettings::Parameter &parameter) const
{
    return m_values.find(parameter) != m_values.end();
}

/**
 * @brief SettingsImpl::value
 * @param parameter Parameter to ask for
 * @return value if parameter, -1 if invalid.
 *
 * Make sure to check that the parameter has a valid value
 * by calling SettingsSingleton::hasValue() before.
 */
int SettingsImpl::value(const ISettings::Parameter &parameter) const
{
    if (hasValue(parameter)) {
        return m_values.at(parameter);
    }
    return -1;
}

This implementation is exactly the code we have in our singleton from start. So no functionality is changed.

Wrapping this transformation up with a unit test

Since we transformed our classic singleton into something a bit more testable we can create a test case for PinCode where we mock the use of our SettingsSingleton class.

This test case uses GTest, but any test framework will do the job here.

#include "gtest/gtest.h"

#include <isettings.h>
#include <pincode.h>
#include <settingssingleton.h>

class SettingsMock : public ISettings
{
public:
    bool hasValue(const Parameter &parameter) const override;
    int value(const Parameter &parameter) const override;
};

bool SettingsMock::hasValue(const Parameter &parameter) const
{
    return parameter == ISettings::Parameter::PinCode;
}

int SettingsMock::value(const Parameter &parameter) const
{
    if (parameter == ISettings::Parameter::PinCode) {
        return 1234;
    }
    return -1;
}

TEST(testPinCode, sample_test)
{
    SettingsSingleton::initialize(std::make_unique<SettingsMock>());

    PinCode pinCode;
    EXPECT_EQ(pinCode.validPinCode(1234), true);
    EXPECT_EQ(pinCode.validPinCode(0), false);
    EXPECT_EQ(pinCode.validPinCode(1), false);
    EXPECT_EQ(pinCode.validPinCode(2), false);
}

In the test case we create a class called SettingsMock which is derived from ISettings. This allows us to do SettingsSingleton::initialize<SettingsMock>(); which will initialize our singleton implementation with our mocked object!

Conclusion

Once again, this is not a post pushing to more use of singletons - it’s the exact opposite!

The drawback with this is that the singleton needs to be initialized. This can, in some cases, be problematic to find the right place for doing initialization. Another drawback is the possibility to use the singleton before it’s initialized.

On the other hand getting a singleton implementation that is possible to use in unit testing is a really really good thing if your legacy code base uses singletons.

Example code

All the code for this blog post is available at my github repo. It is a CMake based project that shall be portable to any platform, but I only tested it on Linux.

It contains three branches.

  • classic-singleton - This is what we start the example with. A classic implementation of a singleton.
  • singleton-with-interface - First step of transformation by adding an interface and implementation. This is what I talk about in step 1 and 2.
  • tranformed-with-testcase - This is the final result with a simple GTest based test case on PinCode.
distcc with CMake/QMake to speed-up your builds

Sometimes smart ideas takes time. But maybe using distcc from now on will catch up some of the lost time. It’s a bit embarrassing that it took me one year before I thought about setting up distcc, even though I perfectly new what it was!

I’ve been working from home the last year due to Covid-19. I also have a Linux-server in the basement - just because it’s fun. I use that server more or less for nothing. But it still fun to have - for nothing. Then the other day it just came to me.

Why not use that server to speed-up my builds!

So here is some tips/thoughts/instructions on how to let distcc speed-up your builds. And I can tell you right now - you gain speed!

distcc

If you look at distcc:s Github page you can read.

distcc is a program to distribute compilation of C or C++ code across several machines on a network. distcc should always generate the same results as a local compile, is simple to install and use, and is often two or more times faster than a local compile.

And that’s more or less it! distcc will distribute you build jobs on to other computers. You simply run distcc like this:

$ distcc gcc -c foo.c

In the last part of this post I will go through a bit more in detail how to integrate distcc into a project. The above is just a simple example.

When distcc runs it will automatically send over the data the build-node need. Nothing (except compilers) needs to be installed on the other machines. No source files or object files are needed or will be stored on the other machines. Since distcc uses the network for all this it’s nice to have a network with pretty good speed. But even a WiFi works.

distcc on your machine and servers

Installation

You need to install distcc both on your development machine and the servers you plan to use for building. If you use Ubuntu it’s as simple as:

$ sudo apt install distcc

Configure distcc

When reading about distcc there are two ways of configuring it. The old way or what is called zeroconf. We will go with the new (from around 2007 :) ). When using zeroconf distcc will use mDNS (using Avahi) to automatically detect different computers/nodes to use for building. You also need to configure which network interfaces distcc shall listen to.

Below is my configuration on my server (/etc/default/distcc)

STARTDISTCC="true"
ALLOWEDNETS="192.168.1.0/24"
LISTENER="192.168.1.200"
NICE="10"
JOBS="10"
ZEROCONF="true"
  • STARTDISTCC - Will make sure to start distcc at boot.
  • ALLOWEDNETS - Specifies which IP-addresses are allowed to connect. In this case any one on the net 192.168.1.x.
  • LISTENER - Which network interface to listen do connections.
  • JOBS - Number of jobs to run in parallel,
  • ZEROCONF - Set to true to use mDNS.

That’s more or less it!

Test your setup

To test your setup simply run:

$ distcc --show-hosts
127.0.0.1:3632/14
192.168.1.200:3632/10

The above example show that three nodes/machines are available. My laptop (127.0.0.1) and my server (192.168.1.200).

Compilers

You need to have the same compilers installed across you build machines. So in my case I have GCC 9.3 installed on both my laptop (development machine) and on my server.

Cross-compilation with distcc is possible, but that will be another post.

Build monitors

There are a number of different monitors one can use to monitor to build status. distccmon-text is a really simple text based version, distccmon-gnome is a GUI based monitor that will display all your builds. When compiling

Setup you project to use distcc

In the beginning of this post I showed how to run distcc. But here I will go into more depth when using distcc with QMake and CMake.

One tip that can speed up your builds even more is to use ccache. Read more about ccache here. In the examples below I will integrate ccache with distcc.

CMake

In CMake there is something called “compiler launcher”. This can be used to tell CMake to run a program to launch a compiler. The nice thing is that you also can specify multiple launcher. So to enable distcc and ccache whit CMake simply:

$ cmake -DCMAKE_C_COMPILER_LAUNCHER="ccache;distcc" -DCMAKE_CXX_COMPILER_LAUNCHER="ccache;distcc" ..

In this example we enable both ccache and distcc.

QMake

I’ve not spent to much time investigating QMake and distcc. The best options a found is to pass some extra arguments to make.

CXX="ccache distcc g++" CC="ccache distcc gcc"

In QtCreator you do this under “Build Settings” -> “Build steps” -> “Make” -> “Make arguments”.

There might be a better solution, let me know in the comments below!

Running at work and at home

Since distcc uses mDNS to find the build nodes to use you can have one setup at home and a much bigger setup at your office. For example, to speed up all my colleges build times we could hava a bunch of machines ready with distcc. When I need to compile my machine will use mDNS to find the nodes. When at work it will find may machines, when at home it will find one node and lastly when offline it will just use my computer. Thanks to this zeroconf in distcc it will work completely transparent.

Just a sneak peak of what I’ve been up to the last couple of days.

Flutter looks like it can be something for embedded systems. So I’ve spent some time digging into how to use it on embedded targets. Still much more to test and leard. But it might be something that can challange even Qt.

Format your code - all the time

Formatting source code is something that, at least I think, is important to raise the code quality. I meet many developers that don’t have the same strange passion for it though. But the reason formatting your code is important is that you get a uniformed code when reading it, meaning you will decrease the “WTF per minute”-score*.

This article is not about whether a { should be on the same line of the if-case or on the line below. This article is about the tools and method to use to always use the same formatting.

clang-format

Out of the LLVM/Clang open source project the tool clang-format was created. The idea of clang-format is simple. You setup a configuration file that defines the format you like to use on your code and the run clang-format. clang-format will then reformat your code into something that follow your rules in the configuration file. In clang-format there are options for setting more or less everything. Normally you store your settings in a file called .clang-format, then clang-format will use it. It handles code written in C/C++/Java/JavaScript/Objective-C/Protobuf/C#.

Example

void test(QString&data, bool extraString) {
    int i=0;
    for (i=0;i<3;i++) {
        data+="reallylongstringtoproducealonglineasanexample" + QString::number(i * 1000) + "/filetoload.html";
        if (extraString)
        {
            data += "some-extra";
        }
    }
}

To format your code run:

$ clang-format -i mysource.cpp
$

After running clang-format we get this

void test(QString &data, bool extraString)
{
    int i = 0;
    for (i = 0; i < 3; i++) {
        data += "reallylongstringtoproducealonglineasanexample" + QString::number(i * 1000)
                + "/filetoload.html";
        if (extraString) {
            data += "some-extra";
        }
    }
}

The above code is completely useless, but it illustrate what clang-format can do to your code. If you like this formatting or not is not of importance here, because you can setup any rules that you and your team like! Since I write a lot of code together with the Qt framework I’ve continued using the .clang-format file used in QtCreator.

Problems with clang-format

clang-format is a really nice tool to use but it has one problem - legacy code and your commit history. The current project I’m working on has a pretty huge code base which is formatted without any real “rules” from the beginning. When I stepped into the project I started to push for using clang-format.

The problem we have is simple. When reformatting a source file we end up with tons of changes that destroys the commit history and makes merging of branches harder, it also makes reviewing and code archaeology** much harder because you have to look at the changes in the code and first figure out if this is a change of the code or if it’s just a formatting change that actually doesn’t do any thing.

Another problem is maintaining the code format when adding new into already formatted code. But there is just the tool for this - git-clang-format!

git-clang-format

git-clang-format is a simple Python script distributed together with clang-format. The problem is that not so many are talking about git-clang-format.

What git-clang-format solves for us is that it runs clang-format on the changes you made. This means that we can solve the problems I describe above. Every time we change code it can be formatted with clang-format. Our legacy code base we change in will eventually get better and better formatted code without loosing the readability when reviewing code!

The work flow using git-clang-format is pretty nice

  • Develop your code
  • Run git clang-format (no I did not miss a - git-clang-format can be called from git using git clang-format.

This will make sure the changes you have done are correctly formatted!

Using git-clang-format with a pre-commit hook?

git-clang-format is a really nice tool that you can use together with a git pre-commit hook. This means that you can setup a hook that makes sure your code is formatted before doing a commit.

Example pre-commit hook

Below is a simple example of a pre-commit hook. This script shall be named pre-commit and placed in your .git/hooks-folder.

#!/bin/sh  
  
if git rev-parse --verify HEAD >/dev/null 2>&1  
then  
against=HEAD  
else  
# Initial commit: diff against an empty tree object  
against=4b825dc642cb6eb9a060e54bf8d69288fbee4904  
fi  
  
# Test clang-format  
clangformatout=$(git clang-format --diff --staged -q)  
  
# Redirect output to stderr.  
exec 1>&2  
  
if [ "$clangformatout" != "" ]  
then
    echo "Format error!"
    echo "Use git clang-format"
    exit 1
fi

Note: In the above script I use --staged when calling git clang-format. The --staged option makes sure it only looks at staged code and not all changes. The problem is that, when writing this, it’s not part of the official git-clang-format script. It’s still in a pull-request I did for clang-format waiting for review. You can find the script here.

The above is really nice. Instead of just printing “Format error” this is what I have done in my script to make hacking funnier.

$ git commit
______ ______________  ___  ___ _____ 
|  ___|  _  | ___ \  \/  | / _ \_   _|
| |_  | | | | |_/ / .  . |/ /_\ \| |
|  _| | | | |    /| |\/| ||  _  || |
| |   \ \_/ / |\ \| |  | || | | || |
\_|    \___/\_| \_\_|  |_/\_| |_/\_/
 _________________ ___________        
|  ___| ___ \ ___ \  _  | ___ \
| |__ | |_/ / |_/ / | | | |_/ /
|  __||    /|    /| | | |    /
| |___| |\ \| |\ \\ \_/ / |\ \ 
\____/\_| \_\_| \_|\___/\_| \_|
                                   

The new code that is added contains differences 
against clang-format rules. Please fix it before
doing a commit!

A pre-commit in git is a nice thing to have to make formatting easier. But remember that it can be by-passed using --no-verify when calling git commit.

Rewriting history

A big pull-request the other day inspired to dig into how to solve formatting on bigger blocks of changes. The method described below can be used on a single branch with a number of commits that needs formatting, or all your commit.

WARNING: Using git filter-branch is not something I recommend doing in front of friends, I also recommend thinking this through before and not just trust a random blogger you found using Google! git filter-branch can mess things up.

Okay, hope you read the warning! Now time to play!

Lets say we have a branch with 10-20 commits that needs formatting. We like to do this as pros by keeping the commit history, commit dates and authors. To solve this we need to:

  • Check out commit by commit, then
  • Run git-clang-format on the changes
  • Take the changes and amend them to the original commit

This is something git filter-branch can do for you.

Example

We have a branch called feature/this-is-it. It has 10 commit on top of the master-branch. To do all the steps above simple run.

$ export FIRST_COMMIT=$(git rev-list --ancestry-path origin/master..HEAD | tail -n 1)
$ git filter-branch --tree-filter 'git-clang-format --extensions h,cpp $FIRST_COMMIT^' -- $FIRST_COMMIT..HEAD

The above example will fetch your FRIST_COMMIT from where the origin/master is (can be any other branch or commit). The second line will run git filter-branch and for each commit run git-clang-format and run clang-format over all changes from your FRIST_COMMIT and the store that change. The result is a branch where you keep your history but have nicely formatted code!

Summary

I hope this can help you keep your code well formatted and limit your WTF-per-minute score. Leave a comment if you think I missed anything or if there are other tools you use!

* WTF per minute score

The best way of measuring code quality is to count the number of “WTF” (What the fucks) you think in your head when reading the source. Then count the number of time you say WTF out loud and multiply that number with 4. Next step is to sum the two values and divide the sum with the time you spent reading. The you have your WTF-per minute score. It should be low!

*Code archaeology

You know when you dig deep down into old commits to try to under stand why a change was made 13 month ago.

Forward declaration and smart pointer in C++

I preach many thing when talking about programming. But the last years there are two things that is more common in my programming preaching - C++11 smart pointers and forward declaration in header files. But sometimes these two things don’t walk hand in hand. Why?

C++11 and smart pointers

I’ve already written a couple of articles about why we shall use them as much as possible, no need to go into that again.

Forward declaration

First of all, what is it?

bar.h
#pragma once

class Foo; // <- Forward declaration of Foo
class Bar {
   Bar();
   ...
private:
	Foo *m_foo;
}
bar.cpp
#include "bar.h"
#include "foo.h"

Bar::Bar() {
    m_foo = new Foo();
}

In the above example we do a forward declaration of the class Foo. Why?

There are a number of different reasons to do this, but the main being that we reduce the build dependencies between files. Instead of doing forward declaration we could have done a #include "foo.h" in the above code. That is just fine, but it adds a build dependency too foo.h. If we do a change in foo.h the above file will also be treated as “need for rebuild” which might lead to a big chain of rebuilds that is not needed. But in this case we only use Foo as a pointer and the only thing we need to know in the header is that we need to reserve space for a pointer, we don’t need any more information about Foo until we start m_foo in the source, and hence we do the `#include “foo.h” in the source file.

Doing this will help speeding up incremental builds when developing code which will reduce frustration from us developers and also save power (no planet B you know)!

Put the above two things together and you get into trouble

We can more or less take the same example above, but instead of class Foo and Bar we have Device and FooService. We also use std::unique_ptr (this is the same with std::shared_ptr and std::weak_ptr).

#pragma once

#include <memory>

class Device;

class FooService
{
public:
    FooService();

    void someFunction();
    int getInspiration();

private:
    std::unique_ptr<Device> m_device;
};

We forward declare the class Device instead of including device.h and are happy about that until we compile this code.

/usr/include/c++/7/bits/unique_ptr.h:76: error: invalid application of ‘sizeof’ to incomplete type ‘Device’
  static_assert(sizeof(_Tp)>0,
                      ^

WTF! Thanks for that error message.

You start to think!

This should work, it’s just a pointer.

This has worked before.

So let’s break this down. You might have written code just like this and got away with it. You might give up and just do the #include "device.h" because it needs the type information.

The real problem here

The real problem here is that we let std::unique_ptr handle the deletion of m_device using its default deleter function (which is great, the hole idea with std::unique_ptr). But the std::default_delete doesn’t know how big the class Device is at this point so how can it know what to delete?

Looking at the C++ reference documentation for std:unique_ptr it says:

std::unique_ptr may be constructed for an incomplete type T, such as to facilitate the use as a handle in the Pimpl idiom. If the default deleter is used, T must be complete at the point in code where the deleter is invoked, which happens in the destructor, move assignment operator, and reset member function of std::unique_ptr. (Conversely, std::shared_ptr can’t be constructed from a raw pointer to incomplete type, but can be destroyed where T is incomplete).

The simple solution

So what does this mean? Well simple - create a destructor!

#pragma once

#include <memory>

class Device;

class FooService
{
public:
    FooService();
    virtual ~FooService();

    void someFunction();
    int getInspiration();

private:
    std::unique_ptr<Device> m_device;
};
#include "device.h"
...
FooService::~FooService() {}

By just creating an empty destructor in fooservice.cpp where we included device.h we now have “created the place” were std::default_delete runs and then it knows the size of Device. This is we you might have written code that works because you had a destructor.

This was a short and simple post. Hope you like the tips! Thanks for reading!

Structured bindings in C++17

Many people argue that C++ is an old outdated language when compared to more modern ones like Python, Go, Rust and many more. Sure, in some cases this might be true. But I strongly feel that many times when C++ is compared against other languages it’s compared with what C++ was around the 90’s and not what it is now.

So this post is both for clearing my head* and showing what structured bindings in C++17 will let us do.

Why structured binding?

Well, finally we can return more than one parameter from a function! Blog post is done! Thanks for reading, see ya next time…

But there is more to it, so keep on reading. Even though multiple return-values was the reason I started to look into structured bindings it doesn’t mean it is done there. There are a number of places were structured bindings will help you write cleaner C++ code.

Examples on where to use it

I’ll list a number of different places were structured bindings can be used, some might be better than others. The first two are the ones I really like, the last two might not be something I will use every day, but might be good to know about.

Multiple return values

I walk in the park to return multiple values from a function! Just return a std::tuple then use auto[] to handle the values.

In the example below we create the return values using std::make_tuple(). A std::tuple can contain how many elements you like so not limited to three as in this example.

#include <iostream>
#include <tuple>

using namespace std;

std::tuple<int, std::string, float> foo()
{
    return std::make_tuple(1, "Hello world!", 3.14f);
}

int main()
{
    auto [line, str, pi] = foo();
    cout << str << endl;
    return 0;
}

In the the above example we use auto [line, str, pi] to decomposing the variables. This is the simplest solution and requires the least amount of writing. But it requires you to define the variables, even if you are just interested in two of them.

One solution to that is using std::ignore. The problem with that is that you instead need to use std::tie.

int line;
std::string str;
std::tie(line, str, std::ignore) = foo();

The above snippet shows how to replace auto[] with std::tie. The only difference is that you need to define the variables before, but instead can use std::ignore. So more writing :(

Happy returning!

Iterating over maps

Next up - std::map!

Using range-loops when dealing with std::vector or std::list have made the C++-code much cleaner. But std::maps has been a bit tricky to handle with range-loops. But not with C++17!

std::map<int, std::string> myMap;

myMap.insert({1, "Apple"});
myMap.insert({2, "Orange"});
myMap.insert({2, "Lemon"});

for (auto &[id, fruit] : myMap) {
	std::cout << id << " " << fruit << std::endl;
}

In the above code we create a simple std::map<int, std::string> and inserts some fruits. The last thing we do is to iterate over the map by using auto &[id, fruit]. This creates a super-simple range based loop with a really clean look! I really like using std::map when coding. But the missing part of std::map has always been the range based loops. With C++17 it’s solved!

Array

Well, is this really something good? I don’t know. But you can use structured bindings together with arrays.

int arr[3] = { 1, 2, 3};
auto [x, y, z] = arr;

std::cout << x << y << z << std::endl;

The above code will bind the first value in the array to x, the second to y and so on. This looks pretty okay at first glance. But you end up with the same problem as with return values from functions - the amount of variables must match with the array. So it might be a bit tricky to use.

Structs and variables

You can use structured bindings together with struct. Just dive into the example.

struct Point {
    float x;
    float y;
    float z;
};

Point p { 1.f, 2.5f, -0.4f };

auto [fX, fY, fZ] = p;
std::cout << fX << " " << fY << " " << fZ << std::endl;

As you can see we can create the variables fX, fY and fZ that we bind to the Point x, y and z. But really why? Is it that hard to write p.x? Please leave a comment and enlighten me if so!

Conclusion

I like to use structured bindings for std::maps and return values for functions. It really creates cleaner code that is simple to read. What do you think? Leave a comment and share your thoughts.

See ya!

*The passion for coding doesn’t always match your work, but never let someone take away your passion.

Better resource handling, less gray hair in C++

The last couple of years I’ve been getting more and more interested in making C++ simpler to maintain and use. Resource handling in C++ is one issue were I (and others) have been struggling. Struggle that cased bugs, frustration and maybe a few gray hairs. In this article I’ll try to explain my “rules” to sort out this resource struggle by using smart-pointers.

In the end this is also about my quest for getting rid of naked new and delete from the source, but also to make sure we have a clear view on resource ownership.

In this post I will cover

  • Ownership of resources
  • When to not pass a smart-pointer
  • Why const

No raw-pointer and references as member variables

It is a pretty common case to pass raw-pointers or references into a class constructor to create some sort of aggregation or composition which creates a dependency. Personally I think that this is not the best way to develop when C++11 have the smart-pointers.

The problems with raw-pointers and references as member variables:

  1. There is no way of knowing if this is a composition or aggregation, in other words - no way of known who owns the resource.
  2. The class that holds the raw-pointer/reference can’t guarantee that the raw-pointer/reference will outlive the class itself, it is up to the developers to keep track on.
  3. If there is a need for a pointer, that is only an internal pointer in that class, just use a std::unique_ptr<> to get rid of the raw-pointer and you can get rid of the deallocation in the destructor for the class and hopefully get rid of the destructor it self.

So start with getting rid of the raw-pointers and references as member variables and replace them with smart-pointers.

Solving the owner problem.

In a class you can have three types of ownership - a unique-, a shared- and a weak ownership (weak ownership is also called weak-reference). With smart-pointers we can explicitly select the ownership in the code, without them it’s not possible.

The code below illustrate the danger with raw pointers as members.

class Foo {
public:
    Foo (Bar *bar) { m_bar = bar; }
    void doWork() {
        if (m_bar != nullptr)
            m_bar->doWork();
    }
private:
    Bar *m_bar = nullptr;
};

There is no way in the above code to know anything about the ownership of m_bar. Is it shared, is it unique? A potentially dangerous situation can be this.

Bar b = new Bar();
Foo f(b);
delete b;
// b is deleted, but calling f.doWork() will
// call Bar::doWork() by using a deleted pointer.
f.doWork(); // <- Segmentation fault!

But if we switch to smart-pointers we can solve this problems. Now let’s look at how we create a specific ownership using smart-pointers in C++.

Unique ownership

class Foo {
public:
    Foo (std::unique_ptr<Bar> bar) {
        m_bar = std::move(bar);
    }
private:
    std::unique_ptr<Bar> m_bar;
};
// Create f which has a unique ownership now
Foo  f(std::move(std::make_unique<Bar>()));

The above code has a unique ownership now and it will generate compile time errors if you do not move your std::unique_ptr<Bar> into the class Foo. Also this is readable by the developer. There is no question about the ownership in this case, The class Foo has the unique ownership and responsibility of m_bar at this point.

Shared ownership

class Foo {
public:
    Foo (std::shared_ptr<Bar> bar) {
        m_bar = bar;
    }

private:
    std::shared_ptr<Bar> m_bar;
};

Bar bar = std::make_shared<Bar>();
Foo f(bar);

In the above example the class Foo is changed to have a shared ownership. We are using a std::shared_ptr now which means that we can guarantee that m_bar will be available as long as our instance of Foo is available. We also know that all resources of Bar will be released when no one needs it any more. That means that bar can be passed to other classes or used in any other way. The shared ownership is also a really nice way of replacing lazy singleton solutions from your code.

Weak ownership

First of all, weak ownership what is that for kind of ownership? Well a ownership were the resource might be available but you need to make sure it is before using it. But when you use it, you know that it’s available. This is exactly what std::weak_ptr does.

class Foo {
public:
    Foo (std::weak_ptr<Bar> bar) {
        m_bar = bar;
    }

    void doWork() {
        if (!m_bar.expired()) {
            std::shared_ptr<Bar> bar = m_bar.lock();
        }
    }
private:
    std::weak_ptr<Bar> m_bar;
};

Bar bar = std::make_shared<Bar>();
Foo f(bar);

Now we have modified Foo so that it has a weak ownership (or a weak reference). This means that m_bar can be expired and not valid any more which is something we must check before we use it. This is done by:

if (!m_bar.expired()) {
    std::shared_ptr<Bar> bar = m_bar.lock();
    bar->doWork();
}
// OR
// This is the same as above but shorter
if (auto bar = m_bar.lock()) {
    bar->doWork();
}

When using std::weak_ptr you assign a std::shared_ptr to it (as value). Later when you use your std::weak_ptr you must make sure it’s still valid. This is done by either calling std::weak_ptr::expired() or by calling std::weak_ptr::lock() and look if the returning pointer is not nullptr.

After calling std::weak_ptr::lock() we have a std::shared_ptr that we can act on and that will stay valid at least until we release it, maybe longer depending on if other holds any reference to it. Using std::weak_ptr is a really useful when working with caches for example. But there are many other use-cases for it!

Ownership - summary

The above examples of different ownership shows that by removing raw-pointers and references from your member variables and instead replacing them with smart-pointers your architecture becomes safer (in that sense you get compile errors) and much clearer for the other developers looking at your code.

By using smart-pointers we now have a clear picture of which ownership is used. Also the ownership is automatically maintained by the smart-pointers and not by us developers!

Foo (std::unique_ptr<Bar> bar) // Unique ownership
Foo (std::shared_ptr<Bar> bar) // Shared ownership
Foo (std::weak_ptr<Bar> bar) // Weak reference

The above example show that by just looking at the signature of the constructor/function we can know which ownership type is used.

When to not pass a smart-pointer

In the above section I write that all raw-pointer shall be removed from member variables, but that is not the same thing as raw-pointers (and references) are bad and ugly. In contrary they fulfill the next step in making the architecture clearer.

But first of all we need to setup a number of ground guide-lines/rules to work with.

  1. Never ever convert a raw-pointer (or reference) that is passed as a function argument into a smart-pointer by using std::unique_ptr<>() or std::shared_ptr<>().
  2. If a function has a reference as parameter the caller is responsible for making sure that reference is valid.
  3. If a function has a raw-pointer as parameter the caller can pass nullptr into said function so the function must make sure that the pointer isn’t nullptr.
  4. Try to use rule 2 over rule 3.

Rule 1 - Never create a smart-pointer from a raw-pointer (or reference)

I cannot emphasize this enough. I my opinion you shall never convert a raw-pointer into a smart-pointer if the raw-pointer is passed as a function argument. This will lead to double deletes and frustration.

class Foo {
public:
    void setBar(Bar *bar) {
        // Don't do this!!!
        // Please don't!!!
        m_bar = std::shared_ptr<Bar>(bar);
    }

private:
    std::shared_ptr<Bar> m_bar;
};

Bar bar;
auto foo = std::make_unique<Foo>();
foo->setBar(&bar);

The above example illustrates the risk of converting raw-pointers into smart pointers without letting the developer really know. The code above will cause a double release and a crash.

Rule 2 - Reference as parameter

class Foo {
public:
    int calculateLength(const Bar &bar) const
    {
        return bar.length() + length();
    }
};

Bar b;
Foo f;
f.calculateLength(b);

If we design our code with this rules in mind the caller of Foo:calculateLength(const Bar &bar) knows that there is no ownership change (thanks to rule #1) or any other strange thing related to the reference that is passed. And also the developer of the class Foo knows that it doesn’t need to check that the argument bar is valid.

Rule 3 - Raw-Pointers as parameter

class Foo {
public:
    int calculateLength(const Bar *bar) const
    {
        if (bar != nullptr)
            return bar->length() + length();
        else
            return 0;
    }
};

Bar b;
Foo f;
f.calculateLength(&b);
f.calculateLength(nullptr);

In this case we have a complete different situation. Instead of a reference we pass a raw-pointer. Now the caller can pass a nullptr and it’s the functions responsibility to check whether the argument bar is valid or not.

Rule 4 - Rule 2 over rule 3

Try to pass by reference instead of raw-pointer, but still make sure to follow the rules setup here.

When to not pass a smart-pointer - summary

The above four rules will, together with the the ownership handling when using smart-pointers, create an API that is clear for the user just by examine the function signatures. This helps the developer of knowing that data flow in the system.

Unfortunately there is now way of getting compile time errors on the above four rules. Maybe this is something one could solve by creating a couple of self-designed test in Clang-Tidy! The future will tell. But these rules can be verified during development and during code review. They are pretty simple to follow.

Make sure to use const everywhere it’s needed

You cannot have to much const.

I listen to a talk from CppCon (can’t remember which) were the speaker proposed that C++ should have everything const as default and when you don’t need const you had to mark it mutable. This is more or less impossible to add right now in the C++ language, but this is something we developer can have as a mindset.

const helps us not change things we’re not suppose to change. const gives us compiler error if we try. const is something that a developer can use to “tell” his/hers intentions to another developer.

const when passing raw-pointers and references

This is probably the most common case where you see const used, when passes as function variables.

int Foo::totalCost(Bar &bar);
int Foo::totalCost(const Bar &bar);

int Foo::totalCost(Bar &bar) const;
int Foo::totalCost(const Bar &bar) const;

The above code shows four different functions which all do the same. But it’s only int Foo::totalConst(const Bar &bar) and int Foo::totalConst(const Bar &bar) const were we for sure knows that Bar is not going to be affected by calling this function.

The third variant, int Foo::totalCost(Bar &bar) const, is still const as a function in regards to the class Foo, but bar is still not const, so we can still do none-const operations on bar. This is something we don’t want (in most cases). Instead use the last alternative if everything needs to be const.

When designing API:s using const is something that will help other developers know the intentions of a function of class. const is something that I thing is really essential in your API:s.

const ownership

A const ownership might sound strange. Constantly owning something? - No that is not what it’s about. But when having std::shared_ptr or std::weak_ptr as member variables they might need to be const, which generate a const ownership.

class Foo
{
public:
    Foo(const std::shared_ptr<Bar> bar) : m_bar(bar) {};
private:
    const std::shared_ptr<Bar> m_bar;
}

The code above show that the class Foo has a shared ownership of bar, but in this case the developer also are telling us that it’s const. Foo will (and cannot) do any none-const operations on bar. This can be useful to when a class only are allowed to observe m_bar (in this case). It’s maybe not the most important thing but can still be useful.

Summary

These rules and API design ideas is pretty simple to follow and the benefit of using them is that you get code that is simpler to read, simple to understand how resources are handled.

This doesn’t solve all problems when building big and complex C++ software - but it makes it clearer and easier to understand. Lately I’ve tried to follow them as much as possible while writing code and I really like them. It give me a clear picture over how ownership, something that is often forgotten.

Please leave a comment if you have other ideas, suggestions or simple doesn’t agree with me.

When the company porn filter stopped me from programming

This is new - I tried to push some code the our git server and the company porn filter did not allow it! After spending some time a found the problem in my code

ObjectType *type = new ObjectType();

The porn filters now a days are so sophisticated that the can find naked pointers! Wow!

No that did not happen - it’s just a start of the article

But one thing that happen was that I realize that many still uses naked pointer in C++. Why? Well maybe simply because they don’t know of std::unique_ptr<>, std::shared_ptr<> and std::weak_ptr<> (not covered in this article)?

The problem with naked pointers - you and me

There is nothing wrong with the pointers them self, the main problem is you and me. We tend to forget to deallocate what we allocated. We pass pointers around without having a clear picture who is the owner of it and if it might outlive another objects that handles it. This results is crashes and/or memory leaks.

So to solve this we can use these “Smart Pointer” that will help us with resource allocation and deallocation. They also helps us handle ownership of our pointers.

The syntax of smart pointers

This is the simple part. The syntax for using a smart pointer is the same as for a raw pointer.

std::string *rawPtrString = new std::string();
std::shared_ptr<std::string> smartPtrString = std::make_shared<std::string>();

if (rawPtrString != nullptr)
    std::cout << rawPtrString->size() << std::endl;
if (smartPtrString != nullptr)
    std::cout << smartPtrString->size() << std::endl;

The ->-operator is used to access the pointer member functions/variables. You can also use the smart pointer to compare against nullptr.

To access the raw-pointer one can use .get(), to release the pointer one can use .release(). I will not go more into detail about the specific member functions available. More info can be found here

Maybe in some other article I will cover them more deeply.

std::unique_ptr<> - The most simple one

The std::unique_ptr<> is the simplest smart pointer. It hold a pointer and it’s unique. It will deallocate the pointer when the variable goes out of scope. Here is an example

Allocation/Instantiation

#include <memory>

class Foo
{
public:
    Foo()
    {
        m_bar = std::make_unique<Bar>();
        std::unique_ptr<Bar> anotherBar = std::make_unique<Bar>();
    }

private:
    std::unique_ptr<Bar> m_bar;
};

This example has two std::unique_ptr<>:s, m_bar as a member variable in Foo and anotherBar as a variable in the constructor of Foo. Both m_bar and anotherBar is created in the constructor.

m_bar = std::make_unique<Bar>();
std::unique_ptr<Bar> anotherBar = std::make_unique<Bar>();

Both are using std::make_unique<> to allocate the new Bar-objects on the heap memory. The difference between m_bar and anotherBar is simply that m_bar will deallocate Bar when the Foo object is deallocated and anotherBar is deallocated when exiting the constructor (it’s scope). So what std::unique_ptr does is simple deallocating it’s resource when exiting it’s scope!

std::make_unique<> is a C++14 feature. If using C++11 you would have to use m_bar = std::unique_ptr<Bar>(new Bar()).

Why you can’t copy a std::unique_ptr

By design a std::unique_ptr isn’t copyable. Nothing strange with that when you think about it. If you would copy something that is unique, it’s not unique any more.

But instead of copy we can transfer ownership by using the move-semantics.

class Foo
{
public:
    Foo(std::unique_ptr<Bar> bar) {
        m_bar = std::move(bar);
    }

private:
    std::unique_ptr<Bar> m_bar;
};

int main(int argc, char *argv[])
{
    auto bar = std::make_unique<Bar>();
    Foo f(std::move(bar));
}

As you can see in the example above std::move(bar) is use to move the ownership from one to another.

std::shared_ptr<> - pointer with build in ref. counter

The difference between a std::unique_ptr and std::shared_ptr is that the std::shared_ptr has a shared ownership instead of the unique ownership that std::unique_ptr has.

So what does shared ownership mean? Simply put it the last owner is the one making sure the the resource is deallocated. In Arthor O’Dweyers talk about smart-pointers at CppCon he had an analogy about the last person exiting a room is responsible for turning the lights off.

The rules for this shared responsibility (turning the light of) is simple. When you enter the room you put a token into a jair, when you exit you take one token out. If the jair is empty when you take you token out - you turn the lights of.

std::shared_ptr works in the same way. For every shared-owner that exists the reference counter is increased and when the pointer loose a shared-owner it decrease the reference counter. If the counter is zero it will deallocate the pointer.

This creates a way of having a shared ownership of pointers. You can create a std::shared_ptr and pass it to another object that also holds a reference to it and no longer worry about when the resource is deallocated.

class Foo
{
public:
    Foo(std::shared_ptr<Bar> ptr) {
        m_bar = ptr;
    }

    void work() {
        m_bar->work();
    }

private:
    std::shared_ptr<Bar> m_bar;
};

int main(int argc, char *argv[])
{
    auto bar = std::make_shared<Bar>();
    auto foo = std::make_unique<Foo>(bar);

    foo->work();
    // Reset bar
    bar.reset();

    // Still okay, because m_bar still has a
    // reference to bar created in the beginning
    foo->work();
}

Why use std::make_unique and std::make_shared?

A *a = std::unique_ptr<A>(new A());
auto a = std::make_unique<A>();

Why is the later better. Well two things. First of all std::make_unique<>() is a bit more optimized, but let’s not get into that. Second and the more important reason to use std::make_unique<>() and std::make_shared<>() - You can end up with code that doesn’t contain any new or delete.

When I first learned C++ the thing you should do was to make sure to add your delete that “matched” the new you just added. But now we don’t need delete anymore so let’s get rid of new also and get rid of that said rule!

Custom deleters

Both std::unique_ptr and std::shared_ptr handles defining a custom deleter. This can be used for customizing which code needs to be executed for releasing the resources. This is especially be useful when working with many C-libraries.

For example when working with libLXC you use lxc_container_new(...) and lxc_container_put(...) to allocate and deallocate a container. Using smart-pointers this can be done by:

struct LXCDeleter
{
    void operator()(lxc_container *ptr) const {
        lxc_container_put(ptr);
    }
};

auto filePtr = std::unique_ptr<lxc_container, LXCDeleter>{ lxc_container_new("foo", nullptr) };

The above example will create a std::unique_ptr<> by using lxc_container_new("foo", nullptr) to allocated the container. When the unique_ptr goes out of scope it will use the custom deleter LXCDeleter which will call lxc_container_ptr(ptr) to deallocate!

Another example is when working with files.

struct FileDeleter
{
    void operator()(FILE *ptr) const {
        fclose(ptr);
    }
};

auto filePtr = std::unique_ptr<FILE, FileDeleter>{ fopen("foo.txt", "rw") };

The above code will make sure to close the file when the std::unique_ptr goes out of scope.

Whats next?

Well you tell me. I got some ideas to continue write about std::week_ptr<> or maybe go into more detail one how to reference-counting works, or how to design good API:s with smart-pointers. There is also the fun std::enable_shared_from_this that can be something to write about.

But most important - start writing code with no naked new or delete.

Also spam your company porn filter with this.

Handling multiple languages in Qt and QML is simple thanks to tr() and qsTr(), but what about handling bidirectional layouts? Well - develop your QML in a good way and it’s simple, two lines of code if you are lucky. But in most cases some more - but just some.

In this post I would like to share some of the ways to handle this in QML and some experience I got doing this.

LTR vs. RTL

Having read from left to right my whole life it was pretty strange seeing a user interface switch to RTL (right-to-left). More or less everything is mirrored. If your application “flows” from left to right this flow shall be changed. But not everything is mirrored in a user interface. Googles Material Design has a really great guide how to handle layout mirroring that you can find here. This is the best guide I found and I guess that Google knows what they are talking about.

Steps for success

First of all - Qt and QML handles this for you if you develop your application in a smart way! Don’t reinvent the wheel one more time!

Setting the layout from C++ or QML

First of all before we start to look at how to mirror a layout we need a way of telling the application that it shall be mirrored. This can be done either in C++ or QML.

The QGuiApplication has a property that is called layoutDirection() that returns a Qt::LayoutDirection. Qt::LayoutDirection can be either Qt::LeftToRight or QtRightToLeft, there is also a Qt::LayoutDirectionAuto which for now is out of scope.

This property can be set from either C++ or QML when you would like to mirror your layout. It is also very useful to use in your QML code to know when to switch to Right-To-Left layout.

Qt.application.layoutDirection === Qt.RightToLeft

Example: How to know if you are using Right-To-Left layout or not.

QML and LayoutMirroring

In QML there is an attached property called LayoutMirroring. An attached property is a property that can be added to any other QML item to give it more properties/features. Attached properties is probably worth its own post in the future.

What LayoutMirroring does is simply to mirror the layout (hence the name). If it is enabled it will transform your anchors.left: foo.left to anchors.right and vice versa.

LayoutMirroring holds two properties, enabled and childrenInherit. Enable is simple to understand, on or off. The property childrenInherit is a boolean that will set LayoutMirroring on all children components. This means that if you set this property on your QML root node/item it will propagate this feature on to all other children in the object hierarchy. So two simple lines can make a huge difference!

Window {
  width: 200
  height: 200

  LayoutMirroring.enabled: Qt.application.layoutDirection === Qt.RightToLeft
  LayoutMirroring.childrenInherit: true
}

Example: Setting LayoutMirroring in QML.

Anchoring is your friend

To get the LayoutMirroring to work it requires you to use anchoring when positioning your items in QML, otherwise the layout mirroring has no effect.

Item {
  // Big no no - use anchors
  Recthangle {
    x: 10; y: 10
    width: 20; height: 20
    color: "red"
  }

  // Much better
  Rectangle {
    anchors: {
      top: parent.top
      left: parent.left
      topMargin: 10
      leftMargin: 10
    }
    width:  20; height:  20
    color: "red"
  }
}

This can be a big task to switch from not using anchors to using it. So make sure to use anchors from the start.

Disable layout mirroring on some components

As you can read in Google’s guidelines some components shall not be mirrored. One such thing is a progressbar that visualize the passage of time. This means that we must be able to disable layout mirroring for some components.

I think it’s best to enable LayoutMirroring in your root QML object of your application instead of setting it for each single component/item. It is really simple to disable it, just set LayoutMirroring.enabled to false on that specific component you don’t want to mirror. You might need to set the inheritChildren property also if your components holds children.

Handle icons and images

LayoutMirroring only mirrors the layout, not icons/images this is something that needs to be handled by you. The Image item in QML can easily be mirrored using the property mirror. Set that to true and the icon will be mirrored.

This, like anchoring changes, can be a huge task to do, so instead of setting this mirror property on every single place your use Image divide them into simple QML components. For example, take a UI similar to the iPhone settings menu.

Example

Image: Example from my iPhone (also some Swedish text, but you get the sence for it, right?

The QML (pseudo code) for this might look something like this:

ListView {
    model: fooModel
    delegate: MyRow {
        width: ListView.view.width
        Image {
            id: icon
            anchors: {
                left: parent.left
                leftMargin: 40
                verticalCenter: parent.verticalCenter
            }
            source: iconSource
        }
        Text {
            anchors: {
                left: icon.left
                leftMargin: 40
                verticalCenter: parent.verticalCenter
            }
            text: itemText
        }
        Image {
            anchors: {
                right: parent.right
                leftMargin: 40
                verticalCenter: parent.verticalCenter
            }
            source: "arrow.png"
        }
    }
}

The problem with this code is the last Image, that renders the small arrow icons to the right of each row. When using LayoutMirroring this arrow icon will be on the left side instead of the right, but the icon it self will not be mirrored. This can be fixed by setting the mirror property:

Image {
    mirror: Qt.application.layoutDirection === Qt.RightToLeft
    anchors: {
        right: parent.right
        leftMargin: 40
        verticalCenter: parent.verticalCenter
    }
    source: "arrow.png"
}

This works fine, but your code will have a bunch of these Qt.application.layoutDirection === Qt.RightToLeft here and there to mirror images/icons. One thing you can do to make this simpler is to create a MirroredImage- component

// MirrorImage.qml
Image {
    mirror: Qt.application.layoutDirection === Qt.RightToLeft
}

Then it is simple to exchange your Image-items to MirroredImage-items when you would like to have an image/icons mirrored. It is just one line of code you save, but it makes to code much more readable!

Conclusion

Thanks to Qt and QML (as always) this is a quite simple task, just stick to using anchors!