So - first of all! Qt has a really nice suite of tools for handling translations. I’m not writing this to say that use this instead of there suite. This is just an alternative that might solve some needs.

Handling translations in Qt is super super simple. In C++ code you use the QObject::tr(...)-function to both mark a string for translation and to translate the string it self (in QML you use qsTr()). So for example.

auto button = new QPushButton(tr("My Button"), this);

To extract the strings that needs to be translated from your application you use the Qt tool lupdate. lupdate will scan source code for places were QObject::tr(...) is used and create an XML-file that can be imported into Qt Linguist. After everything is translated you export the translations into a binary format that is then used within you application.

But what is happening under the hood with tr()

Maybe I will over simplify this a bit. What happens is that

  • When the application is started the QCoreApplication will setup a QTranslator that loads the exported translations (depending on your application) from Qt Linguist/lconvert.
  • When you call QObject::tr(...) it will call QCoreApplication::translate(...) which will use the QCoreApplication:s QTranslator and call QTranslator::translate(...). QTranslator::translate(...) will then return a translated string. The good thing here is that QTranslator::translate(...) is virtual, so we can overload it!

So by looking at the example above tr() is called with My Button - so the QTranslator needs to be able to map My Button in some way so it fast and simple can lookup the translation for this.

Let’s create an example - Rövarspåret

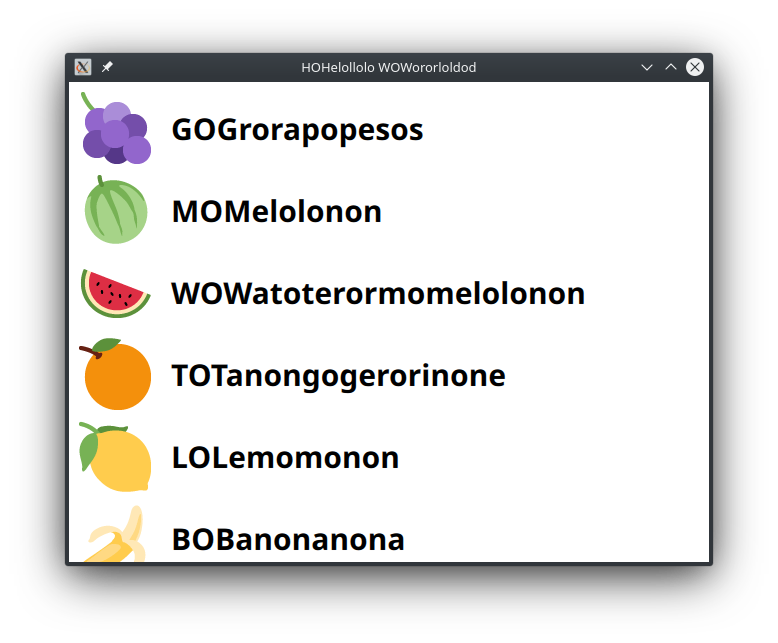
I’m from Sweden and my childhood has been mark by many of Astrid Lindgrens books. In the books about Bill Bergsson the kids are solving crimes. To be able to speak in code they’ve invented a language called Rövarspråket (in English - The Rubber Language). It is a fairly simple code. Every consonant is doubled and an ‘o’ is inserted in between. The vowels are left intact. So Erik is Erorikok. Qt is Qoqtot.

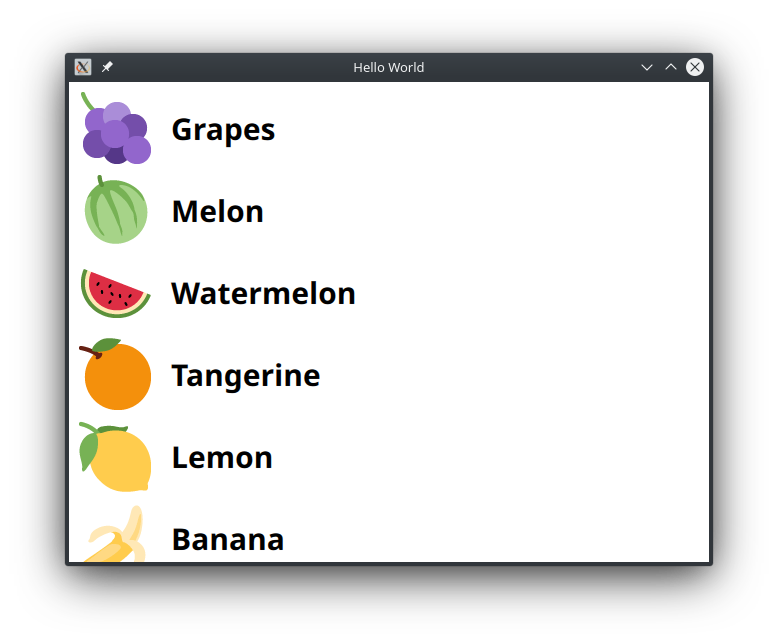
We start with a really simple QML application - a list of fruit emojis.

Simple application

import QtQuick 2.12
import QtQuick.Window 2.12

Window {
    visible: true
    width: 640
    height: 480
    title: qsTr("Hello World")

    ListModel {
        id: fruitModel
        ListElement { name: QT_TR_NOOP("Grapes"); icon: "1f347" }
        ListElement { name: QT_TR_NOOP("Melon"); icon: "1f348" }
        ListElement { name: QT_TR_NOOP("Watermelon"); icon: "1f349" }
        ListElement { name: QT_TR_NOOP("Tangerine"); icon: "1f34a" }
        ListElement { name: QT_TR_NOOP("Lemon"); icon: "1f34b" }
        ListElement { name: QT_TR_NOOP("Banana"); icon: "1f34c" }
        ListElement { name: QT_TR_NOOP("Pinapple"); icon: "1f34d" }
        ListElement { name: QT_TR_NOOP("Red apple"); icon: "1f34e" }
        ListElement { name: QT_TR_NOOP("Green apple"); icon: "1f34f" }
    }

    ListView {
        anchors.fill: parent
        anchors.margins: 10
        model: fruitModel

        delegate: Item {
            height: 82
            width: ListView.view.widht

            Row {
                spacing: 20

                Image {
                    source: "https://github.com/twitter/twemoji/raw/master/assets/72x72/" + icon + ".png"
                    width: 72
                    height: 72
                }
                Text {
                    text: qsTr(name)

                    height: 72
                    verticalAlignment: Text.AlignVCenter
                    font.bold: true
                    font.pixelSize: 30
                }
            }
        }
    }
}

Nothing strange here except for maybe QT_TR_NOOP. What QT_TR_NOOP does is to tell lconvert that this is a string we would like to mark for translation, but when running the code we let the translation happen when we assign the string to the Text-element by using qsTr() - text: qsTr(name).

To make our own QTranslator with Rövarspråket we simply:

#include "mytranslator.h"

MyTranslator::MyTranslator(QObject *parent)
    : QTranslator(parent)
{
    vowels << 'a' << 'e' << 'i' << 'o' << 'u' << 'y';
}

QString MyTranslator::translate(const char *context,
                                const char *sourceText,
                                const char *disambiguation,
                                int n) const
{
    Q_UNUSED(context)
    Q_UNUSED(disambiguation)
    Q_UNUSED(n)

    if (sourceText == nullptr)
        return QString();

    QString srcString = QString::fromLatin1(sourceText);
    QString outString;

    for (const auto &c : srcString) {
        if (vowels.contains(c.toLower()) == false && c != ' ') {
            outString += c;
            if (c.isUpper()) {
                outString += 'O';
            } else {
                outString += 'o';
            }
            outString += c;
        } else {
            outString += c;
        }
    }

    return outString;
}

This will change the incoming string to a translated version using Rövarspråket.

The last thing we need to do before running the program is to install this translator.

QGuiApplication app(argc, argv);

MyTranslator *t = new MyTranslator();
app.installTranslator(t);

Same application but with our translator

You will find the full source code at my github.

Why use your own QTranslator

  • By implementing your own you can select the format to store the data in.
  • You might have a legacy system or another translating system you “have” to use.
  • You need a way to dynamically handle translations and changes in them “live”.

Maybe you can name even more in the comments!

Some other tips regarding translations in Qt/QML

Here are some tips

Pass information to the translator

You can pass comments to the translators by using special tags while commenting

Text {
    //: This is a comment for the translator
    //= 123
    //~ key1 value1
    //~ key2 value2
    text: qsTr("Hello world")

As you can see in the above QML-code (it is the same for C++ code) we can pass a comment, an ID and key-value data to the translator by using some special tags.

QQmlEngine::retranslate()

Since Qt version 5.10 QQmlEngine::retranslate() exists. It’s a slot that you can call the force the QQmlEngine to retranslate all text dynamically. Really simple. Before this was available you had to play som tricks with the text to get them dynamically translatable. This is no longer the case!

Please leave a comment if you like this!

One problem I’ve been facing now and then when developing QML is the need for selecting different QML files depending on hardware, operating system, customer brand etc. QML has a pretty unknown feature for this called QQmlFileSelecor

There are many different use-cases for selecting different QML-file in your application. It can be that you are developing an application that has different UI depending on the screen size (maybe one 3” display and one 7” display in an embedded system). It can also be that you are developing a product that runs under multiple brands but still have more or less the same QML. Or it can simply be the case for debug/release or Window/Linux.

Example

QQmlFileSelecor lets you do this in a simple way. What QQmlFileSelector does is to configure a number of selectors which QML will use when searching for a file. Let us look at an example.

QQmlApplicationEngine engine;

QStringList selectors;
selectors << "desktop";

// Our QQmlApplicationEngine will take owner-ship of fs.
QQmlFileSelector *fs = new QQmlFileSelector(&engine);
fs->setExtraSelectors(selectors);
engine.load(QUrl(QStringLiteral("qrc:/main.qml")));

The above code is pretty standard, the only difference is:

QQmlFileSelector *fs = new QQmlFileSelector(&engine);
fs->setExtraSelectors(selectors);

What we are doing here is actually creating and adding a QQmlFileSelector to the QML-engine with an added extra selector called desktop. When the QML-engine starts to search for main.qml it will look for files in:

./+desktop/main.qml
./main.qml

So now it’s easy do setup a project were you have one (or more) QML-files that are desktop specific just by adding them in the +desktop-folder. Off course you need some code in C++ that creates the correct selector.

if (runningOnDesktop()) {
	// Add your desktop selector
}

You can download the full example at:

Default selectors

To make life even simpler the QQmlEngine has a default selector that is always available. The default selector adds your locale language and operating system information. On my Linux KDE Neon computer my default selectors are:

("en_US", "unix", "linux", "neon")

So if I would like to add a specific QML-file for my application that is only used when running Linux I can just create a folder called +linux and place my content there.

Nested selectors

QQmlFileSelector lets you use nested selectors as well. Let’s go back to the example above. We have added a selector called desktop, but we also have the default selectors available. So our list of selectors looks like:

("desktop", "en_US", "unix", "linux", "neon")

To get your list of selectors look at QQmlFileSelector::selector()::allSelectors()

If we then create a folder structure that looks like:

+desktop/+linux/main.qml
+desktop/main.qml
main.qml

We will have one specific main.qml when we run on desktop and Linux ( +desktop/+linux/main.qml), one when we run on Linux (and not desktop) (+desktop/main.qml) and finally the main.qml for all other cases.

QFileSelector

Qt also has a QFileSelector-class that can by used outside the QML-engine to get the same feature. It can be used to load different images depending on selectors etc. But that is another post!

When Qt 5.12 was release, just before the new year, it contained a new tech-preview which is really interesting, DelegateChooser!

The DelegateChooser helps you build more dynamic ListViews in QML by letting you structure your delegates in a better way. In recent years I’ve done many QML-implementations were the customer would like some sort of list with different items that, depending on data, behaves differently. To illustrate this I made a quick rip-off of the iPhones settings application.

Simple demonstration of QML and DelegateChooser

As you can see in the picture above it’s not that strange. It’s a ListView with some rows and the data comes from a model. In some cases (like the IP-address) it displays text, in some cases it’s on/off switch a third case is the “owner line” with my name and avatar. A pretty common use-case. Before the DelegateChooser was available in QML you would have to implement all this in one single delegate. This could be solved by using a Loader and load different delegates from file or a components. You could also solve it by having one delegate that can handle all cases and show and hide different components depending on the model data. But my opinion is that none of those solutions are really nice.

Now, finally, this can be solved with the DelegateChooser. The DelegateChooser lets you define a list of different delegates that the view can use. The selection is based on one of the roles in the model it self (which is really nice). Your DelegateChooser can even be nested by adding a DelegateChooser as a delegate in a DelegateChooser meaning that you can have one DelegateChooser that will select delegate depending on role X in your model and another DelegateChooser that selects delegate depending on role Y.

Let us break down the application above

We can break down the example application above in three main parts.

  • The model
  • The ListView
  • The DelegateChooser

Model

In this case I have a ListModel that looks like (stored in SettingsModel.qml):

import QtQuick 2.0

ListModel {
    ListElement { type: "empty"; }
    ListElement { type: "owner"; name: "Erik Larsson"; info: "Just a happy Qt hacker"; avatar: "avatar.jpg" }
    ListElement { type: "empty"}
    ListElement { type: "bool"; iconColor: "#00BCD4"; name: "Airplane mode"; valueBool: false }
    ListElement { type: "bool"; iconColor: "#009688"; name: "WiFi"; valueBool: true }
    ListElement { type: "bool"; iconColor: "#4CAF50"; name: "Bluetooth"; valueBool: true }
    ListElement { type: "empty"}
    ListElement { type: "string"; iconColor: "#8BC34A"; name: "IP"; valueString: "192.168.0.10" }
    ListElement { type: "string"; iconColor: "#CDDC39"; name: "Netmask"; valueString: "255.255.255.0" }
    ListElement { type: "empty"}
    ListElement { type: "subsec"; iconColor: "#FFEB3B"; name: "Display settings"; }
    ListElement { type: "subsec"; iconColor: "#FFC107"; name: "Privacy settings"; }
}

It has one role that is called type that is either empty, owner, bool or string. This role is used for selecting which delegate to use. One other thing that is also important to note is the difference between valueBool and valueString. Why the difference in name, why not just call them both for value? Well it seems like the DelegateChooser doesn’t like it. If that is a limitation in the implementation or not is something that I need to dig a bit deeper into at some point.

In this simple example I choose to use a ListView but I could have also useda C++-based model.

The ListView

This application has a super simple ListView. As you can see in the snippet below there is nothing really strange. The ListView will fill out its parent, it will use the model defined above and use the delegate with the id delegateChooser. So let’s look at that one instead.

ListView {
    anchors.fill: parent

    header: heading
    delegate: delegateChooser
    model: SettingsModel {}
}

DelegateChooser

In this application we have four different delegates to choose from (owner, empty, bool and string). To make the code simpler each of these delegates are in it’s own QML-file. We can quickly just look at the delegate for handling bool, which in this case is a QtQuickControls2 Switch.

Simple demonstration of QML and DelegateChooser

// FILE: SettingsDelegate.qml

import QtQuick 2.0
Rectangle {
    property alias text: titleText.text
    property alias rectColor: rect.color

    anchors.left: parent.left
    anchors.right: parent.right
    height: 48

    color: "white"

    Rectangle {
        id: rect
        radius: 5
        width: 32
        height: 32

        anchors.left: parent.left
        anchors.leftMargin: 20
        anchors.verticalCenter: parent.verticalCenter
    }

    Text {
        id: titleText
        anchors.verticalCenter: parent.verticalCenter
        anchors.left: rect.right
        anchors.leftMargin: 10

        color: "#111111"
        font.pixelSize: 14
    }

    Rectangle {
        anchors.left: parent.left
        anchors.right: parent.right
        anchors.bottom: parent.bottom
        height: 1
        color: "#aaaaaa"
    }
}
// FILE SettingsDelegate.qml

import QtQuick 2.0
import QtQuick.Controls 2.12

SettingDelegate {
    text: name
    rectColor: iconColor

    Switch {
        anchors.verticalCenter: parent.verticalCenter
        anchors.right: parent.right
        anchors.rightMargin: 8

        checked: valueBool
    }
}

In the code above you can see that we define if the Switch should be checked or not by using the role valueBool from the model. We also get the name and the iconColor from the model.

Now that we have the delegates them self it’s only to put this together in a DelegateChooser. In this case we select delegate depending on the role type and that’s it.

DelegateChooser {
    id: delegateChooser
    role: "type"

    DelegateChoice {
        roleValue: "empty"
        EmptyDelegate {}
    }
    DelegateChoice {
        roleValue: "bool"
        BoolDelegate {}
    }
    DelegateChoice {
        roleValue: "string"
        StringDelegate {}
    }
    DelegateChoice {
        roleValue: "subsec"
        SubSectionDelegate {}
    }
    DelegateChoice {
        roleValue: "owner"
        OwnerDelegate {}
    }
}

Finally a really nice and clean solution to this common use-case!

The full source is available at my github page, DelegateChooser demo.

Conclution

Well what to say? I’ve been waiting for this since I first started to use QML 9-10 years ago. The implementation is really clean and I think I’ll start using this right away in upcoming projects. The thing I might asaked my self is why didn’t I try to solve the problem by contributing to Qt before?

Remember that this is still a tech-preview and the API might change.

Clang-Tidy is a really great tool that does static code analysis on your code. To be honest I’ve become a much better C++ developer thanks to Clang-Tidy.

My favorite IDE, QtCreator, has something called Clang-Code-Model which is a plugins that runs in the background and in real-time displays things that can be changed. QtCreator also has a tool which can run Clang-Tidy on your project to list potential problems. All this is very nice and makes both you and your code better. But there is one thing missing - integrate into your build.

So I thought I should write a bit on how you can implement Clang-Tidy into your CMake-based project in a really simple way. The goal is that we run Clang-Tidy on the files we compile and not the complete project. The reason for this is speed and also to “force” all team-members to use it.

CMake and Clang-Tidy

Since version 3.7.2 of CMake there is a really simple solution to this. Just set CMAKE_CXX_CLANG_TIDY (there is CMAKE_C_LANG_TIDY for your C code as well) and your done! At least almost. You can set CMAKE_CXX_CLANG_TIDY either in your CMakeList.txt or you can do it from the command line.

set(CMAKE_CXX_CLANG_TIDY "clang-tidy;-checks=*")

or in CMakeLists.txt

set(CMAKE_CXX_CLANG_TIDY "clang-tidy;-checks=*")

These two example above will run Clang-Tidy with all checks enabled.

Passing arguments to Clang-Tidy

The string you pass the CMAKE_CXX_CLANG_TIDY is your different arguments to Clang-Tidy. So the example above passes -checks=* to Clang-Tidy.

Getting checks on headers

By default Clang-Tidy will not check your header files for problems. But you might be interested in running Clang-Tidy on your headers as well. This is done with the argument -header-filter=.. For example:

set(CMAKE_CXX_CLANG_TIDY 
  clang-tidy;
  -header-filter=.;
  -checks=*;)

The above snippet from CMakeLists.txt will make sure to also check header in the .-folder, the project folder. You might need to change this depending on your project setup.

Treating warning as errors

A really nice feature is that you can treat warnings as errors if you like. This can be enabled at any time or maybe just on your CI-build.

The idea is that you configure a number of checks using -checks=... and you configure which of those shall be treated as errors.

Lets say we enable two (randomly selected checks), -checks=bugprone-*,cppcoreguidelines-avoid-goto. Now we set which we would like to treat as errors. If we set -warnings-as-errors=* both of the two tests above will generate errors. If you set warnings-as-errors=cppcoreguidelines-avoid-goto only the test cppcoreguidelines-avoid-goto will be treated as an error.

Remember that by setting -warnings-as-errors=...you don’t enable any test, this must be done by using -checks=.

Below is a example how -warnings-as-errors looks in CMake.

set(CMAKE_CXX_CLANG_TIDY
  clang-tidy;
  -header-filter=.;
  -checks=*;
  -warnings-as-errors=*;)

Example repo

I’ve made a simple example, with some problems that Clang-Tidy finds. You can find it at my Github repo.

ccache is a simple tool that speeds up your builds/rebuilds. It builds up a cache that is used when building and rebuilding. This cache can make a huge performance impact on your build time. On there web page it says.

ccache is a compiler cache. It speeds up recompilation by caching previous compilations and detecting when the same compilation is being done again. Supported languages are C, C++, Objective-C and Objective-C++.

Integrating ccache into your build

I’ve been searching the web for a simple solution to add ccache into a qmake-based project with out any real luck. I found some solutions were people have done some minor hacks like:

# TLDR? No there are better ways...
QMAKE_CXX = ccache $$QMAKE_CXX

Put that in your .pro-file and ccache will sort of work. But since version 5.9.2 of Qt there is a much simpler solution. Tor Arne Vestbø made a nice commit that simplifies this alot.

To use this feature you either add load(ccache) into your .pro-file or add CONFIG+=ccache to your qmake command line.

How much performance gain your project gets is hard to say - so test and see if it will improve your build.

ccache installation

Unfortunately the ccache feature in qmake doesn’t check whether you have ccache installed or not. This is something that is assumed. To install ccache on a Ubuntu based Linux machine run sudo apt install ccache. To solve it on other platforms/distributions I would recommend just simply Google it!

ccache configuration

One can configure ccache in many different ways. The default config (on Ubuntu 18.04) seems to be a maximum cache size of 5 GB. This can easily be changed. More information can be found here.

Build Qt with ccache

The commit I mentioned above also add support for ccache into the Qt5 build. This is something that will speed up your build and also fill your chache :).

Update

Thanks to Cristian Adam for pointing out that this isn’t working on Windows. You see, I don’t own a Windows computer and I hope I never will… But still a big thanks for pointing it out.

To run it on Windows with MinGW you need to pass QMAKE_CXX=ccache g++ when compiling.

QMAKE_EXTRA_COMPILERS in qmake

When reading the documentation for qmake one finds something called QMAKE_EXTRA_COMPILERS. The documentation is clear, but not really an everyday use-case. So I thought I would try to explain QMAKE_EXTRA_COMPILERS with a “real” use-case from a project I’m currently working on for one of Combitechs many customers.

Background

In this project we generate code based on the content of a number of XML-files. Maybe one day I should write a bit about why we are generating code and how we wrote the code-generator as well. But for now the only thing we need to know is that there is a list of XML-files that we use as input to the code-generator and out comes a number of header-files.

When I proposed the code-generator for the rest of the project I promised them that this should be simple and easy to use for the rest. I might have said something like:

Just a parameter with the XML-files in the pro-file

So integrating the code-generation into our qmake-based build was of highest priority. And thanks to QMAKE_EXTRA_COMPILERS it was fairly simple.

What does QMAKE_EXTRA_COMPILERS do

You can read the full documentation of QMAKE_EXTRA_COMPILERS at qt.io. But in short:

  • you setup an executable that qmake will execute.
  • you provide the executable with input argument. You do not have to do, but would be strange not to.
  • you add, if needed the output or data to some other qmake-parameter.

The example on qt.io is based around moc and how to setup your own moc-solution. But in this example we are going to pass a list of XML-files in to this.

Setting it up for code-generation

The goal was to keep the implementation in the main project file as simple as possible.

CG_INPUT += \
    fileA.xml \
    fileB.xml
include(code-generator.pri)

The above code will just create a parameter call CG_INPUT that, in this case, holds fileA.xml and fileB.xml. The next thing we do is to load code-generator.pri.

cg.name = "Internal code generator"
cg.input = CG_INPUT
cg.output = $$OUT_PWD/generated/${QMAKE_FILE_BASE}$${first(QMAKE_EXT_H)}
cg.variable_out = HEADERS
cg.commands = \
    $$OUT_PWD/../code-generator/bin/cg -s -o $$OUT_PWD/generated -r ${QMAKE_FILE_IN}
QMAKE_EXTRA_COMPILERS += cg

DISTFILES += CG_INPUT

Let’s look what the code above does. cg.name just sets a name on the extra compiler we are adding. cg.input = CG_INPUT tells the extra compiler what its input are, in this case our XML-files (fileA.xml and fileB.xml).

cg.output list the output files. This is where it starts to get a bit strange, to be honest. QMAKE_FILE_BASE is one of de “undocumented” things in qmake. What it will do is actually take the filename of, each and every, file from cg.input and remove the file-ending (.xml). After that we add the header-file ending. So our outputs, in this example, will be fileA.h and fileB.h.

cg.variable_out is very useful. You use that to tell which parameter to append the output files to. In this example we append them to the HEADERS-list. This will make sure qmake knows about them. cg.command is the command you would like to execute. I’ve used ${QMAKE_FILE_IN} as input to our code generator. ${QMAKE_FILE_IN} will be fileA.xml resp. fileB.xml. Because we have two XML-files this application will be called twice.

The last, and most important thing, is to append cgto the list of extra compilers. This is done by adding QMAKE_EXTRA_COMPILERS += cg. The name cg is short for code-generation but this variable could have any name, not just cg.

Running it in QtCreator/qmake

This setup makes the use and integration of a proprietary code-generator really simple in QtCreator and qmake. It requires a really small amount of code in the project files to pull this simple hack off.

One thing that took a while to understand is that qmake will execute the cg.command once for every file in CG_INPUT, but only if the output header-file is used somewhere in the code. Offcourse it holds dependencies “back” to the XML-file. If the XML-file content is change the code-generator will be executed on next compilation.

Lose weight with Qt

This post first appeared on my LinkedIn page.

So is it really possible to lose weight using Qt - a cross platform application C++ framework? Well - yes!

I’ve been programming computers since I was ten years old. I loved it from day one and still does. For the past ten years Qt, QML and C++ have taken up quite some time. But in the same time my bike has taken up quite some time as well. I’ve rode my bike from Jönköping-Sweden down to Paris-France to raise money to the Swedish Child Cancer Foundation. I’ve tested my legs on the horrible cobbles at Paris-Roubaix (aka. Hell on North). I even tested one of the toughest stages of Tour de France when I finished Etape du Tour.

But now how to lose weight using Qt… That last year my training motivation has been - let’s say not at the top… So… Hmm… How to boost the motivation… What if I connect my indoor bike to a computer game and start racing there! Everything connected to a computer motivates me…

Zwift is a fast growing computer game and social network where you connect your smart trainer/indoor bike and use the power meter to race against other riders in a virtual world. If you push really hard on your bike your “watts” will increase and you go faster. If you position your self behind another rider you can pedal a bit easier due to the reduces air resistance in the virtual world. Only one problem. How can I connect my indoor bike to Zwift? I’ve already spend a bit to much money on my indoor bike and it’s not possible to connect to a computer, but it can measure power really simple. Buying a new was not an options.

Well a Raspberry Pi 3, an magnetic sensor/switch, an accelerometer and a really simple Qt application is what I need.

Monark test bike

I use a Monark 828e indoor bike. It’s stable, massive and feels really like a real bike does. Calculating the power from this bike is simple. You multiply your cadence with the value of the pendulum scale (the metal gray round thing on the upper right part of the wheel). When I increase the resistance the pendulum will raise to a higher value on the scale. Measure the cadence is simple - a magnetic sensor/switch and a magnet on on of the pedals. Connect the switch to a digital I/O on the Raspberry Pi with a pull-up resistor and you’re done. Measure the angle of the pendulum is a bit trickier. But placing a small accelerometer on the pendulum makes it possible to calculate the angle and calibrate it against the scale on the bike. The accelerometer is connected to the Raspberry Pi using I2C. So now I have everything needed to calculate the power.

Now I only need to send it, using Bluetooth Low Energy, to my iPad where the Zwift game is running. And this is were Qt solves my problem really easy. Using Qt Bluetooth LE API is really simple. The first BLE server example that Qt provides is a heart rate monitor. I just changed that example so instead of using the BLE HeartRateService it uses the CyclePowerMeter service. When I had my hardware setup and connected it took about two hours of programming and calibration to get everything up and running! The hardest part was understanding how the data in the BLE message should be packaged.

And now with this up and running I’m connected to the virtual training world and can start pushing the pedals harder and harder. So is Qt the makes me lose weight? - Well that’s up to you to decide.

The code is available on GitHub.

And what about motivation? - Well two hours of hard work yesterday