When Qt 5.12 was release, just before the new year, it contained a new tech-preview which is really interesting, DelegateChooser!
The DelegateChooser helps you build more dynamic ListViews in QML by letting you structure your delegates in a better way. In recent years I’ve done many QML-implementations were the customer would like some sort of list with different items that, depending on data, behaves differently. To illustrate this I made a quick rip-off of the iPhones settings application.
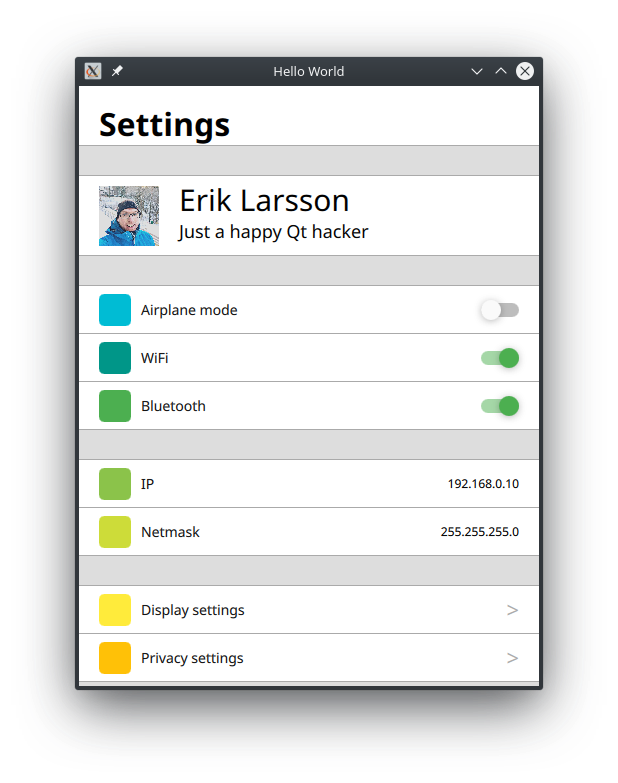
As you can see in the picture above it’s not that strange. It’s a ListView with some rows and the data comes from a model. In some cases (like the IP-address) it displays text, in some cases it’s on/off switch a third case is the “owner line” with my name and avatar. A pretty common use-case. Before the DelegateChooser was available in QML you would have to implement all this in one single delegate. This could be solved by using a Loader and load different delegates from file or a components. You could also solve it by having one delegate that can handle all cases and show and hide different components depending on the model data. But my opinion is that none of those solutions are really nice.
Now, finally, this can be solved with the DelegateChooser. The DelegateChooser lets you define a list of different delegates that the view can use. The selection is based on one of the roles in the model it self (which is really nice). Your DelegateChooser can even be nested by adding a DelegateChooser as a delegate in a DelegateChooser meaning that you can have one DelegateChooser that will select delegate depending on role X in your model and another DelegateChooser that selects delegate depending on role Y.
Let us break down the application above
We can break down the example application above in three main parts.
- The model
- The ListView
- The DelegateChooser
Model
In this case I have a ListModel that looks like (stored in SettingsModel.qml):
import QtQuick 2.0

ListModel {
    ListElement { type: "empty"; }
    ListElement { type: "owner"; name: "Erik Larsson"; info: "Just a happy Qt hacker"; avatar: "avatar.jpg" }
    ListElement { type: "empty"}
    ListElement { type: "bool"; iconColor: "#00BCD4"; name: "Airplane mode"; valueBool: false }
    ListElement { type: "bool"; iconColor: "#009688"; name: "WiFi"; valueBool: true }
    ListElement { type: "bool"; iconColor: "#4CAF50"; name: "Bluetooth"; valueBool: true }
    ListElement { type: "empty"}
    ListElement { type: "string"; iconColor: "#8BC34A"; name: "IP"; valueString: "192.168.0.10" }
    ListElement { type: "string"; iconColor: "#CDDC39"; name: "Netmask"; valueString: "255.255.255.0" }
    ListElement { type: "empty"}
    ListElement { type: "subsec"; iconColor: "#FFEB3B"; name: "Display settings"; }
    ListElement { type: "subsec"; iconColor: "#FFC107"; name: "Privacy settings"; }
}
It has one role that is called type that is either empty, owner, bool or string. This role is used for selecting which delegate to use. One other thing that is also important to note is the difference between valueBool and valueString. Why the difference in name, why not just call them both for value? Well it seems like the DelegateChooser doesn’t like it. If that is a limitation in the implementation or not is something that I need to dig a bit deeper into at some point.
In this simple example I choose to use a ListView but I could have also useda C++-based model.
The ListView
This application has a super simple ListView. As you can see in the snippet below there is nothing really strange. The ListView will fill out its parent, it will use the model defined above and use the delegate with the id delegateChooser. So let’s look at that one instead.
ListView {
    anchors.fill: parent

    header: heading
    delegate: delegateChooser
    model: SettingsModel {}
}
DelegateChooser
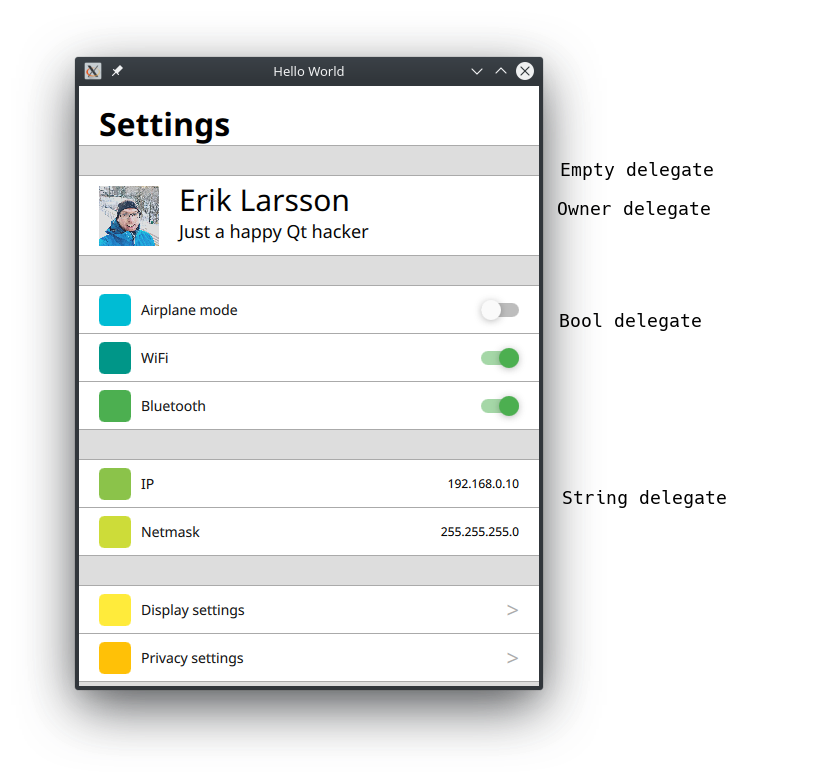
In this application we have four different delegates to choose from (owner, empty, bool and string). To make the code simpler each of these delegates are in it’s own QML-file. We can quickly just look at the delegate for handling bool, which in this case is a QtQuickControls2 Switch.
// FILE: SettingsDelegate.qml

import QtQuick 2.0
Rectangle {
    property alias text: titleText.text
    property alias rectColor: rect.color

    anchors.left: parent.left
    anchors.right: parent.right
    height: 48

    color: "white"

    Rectangle {
        id: rect
        radius: 5
        width: 32
        height: 32

        anchors.left: parent.left
        anchors.leftMargin: 20
        anchors.verticalCenter: parent.verticalCenter
    }

    Text {
        id: titleText
        anchors.verticalCenter: parent.verticalCenter
        anchors.left: rect.right
        anchors.leftMargin: 10

        color: "#111111"
        font.pixelSize: 14
    }

    Rectangle {
        anchors.left: parent.left
        anchors.right: parent.right
        anchors.bottom: parent.bottom
        height: 1
        color: "#aaaaaa"
    }
}
// FILE SettingsDelegate.qml

import QtQuick 2.0
import QtQuick.Controls 2.12

SettingDelegate {
    text: name
    rectColor: iconColor

    Switch {
        anchors.verticalCenter: parent.verticalCenter
        anchors.right: parent.right
        anchors.rightMargin: 8

        checked: valueBool
    }
}
In the code above you can see that we define if the Switch should be checked or not by using the role valueBool from the model. We also get the name and the iconColor from the model.
Now that we have the delegates them self it’s only to put this together in a DelegateChooser. In this case we select delegate depending on the role type and that’s it.
DelegateChooser {
    id: delegateChooser
    role: "type"

    DelegateChoice {
        roleValue: "empty"
        EmptyDelegate {}
    }
    DelegateChoice {
        roleValue: "bool"
        BoolDelegate {}
    }
    DelegateChoice {
        roleValue: "string"
        StringDelegate {}
    }
    DelegateChoice {
        roleValue: "subsec"
        SubSectionDelegate {}
    }
    DelegateChoice {
        roleValue: "owner"
        OwnerDelegate {}
    }
}
Finally a really nice and clean solution to this common use-case!
The full source is available at my github page, DelegateChooser demo.
Conclution
Well what to say? I’ve been waiting for this since I first started to use QML 9-10 years ago. The implementation is really clean and I think I’ll start using this right away in upcoming projects. The thing I might asaked my self is why didn’t I try to solve the problem by contributing to Qt before?
Remember that this is still a tech-preview and the API might change.